Wednesday, July 27, 2011
Brownie Hits The Road
Brownie traveled with me to New Jersey last week and impressed the locals with his verve and can-do attitude.
Tuesday, July 19, 2011
Vintage Parts Excursion Part III: Building A Usable Capacitor Checker


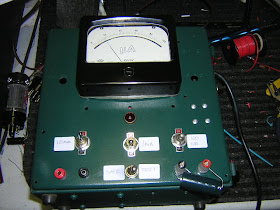
 After a few fits and starts and trips along a few blind alleys I managed to get the capacitor checker project up and running, and it's a pretty nifty piece of gear. This device will test capacitors for leakage in microamps and also can be used to reform electrolytics and check them for leakage. It has three ranges-10 ua, 1 ma and 10 ma. The meter movement is a 199 us Soviet military surplus job, and the cabinet's prior tenant was a Jackson 645 VTVM.
In the picture you can see a new old stock Mallory capacitor leaking about 80 ua of current and an orange drop Sprague showing about 1 ua of leakage, both at 350v. Also there's an electrolytic on the 10 ma range showing about 2 ma of leakage and it settled down after a while.
I've included two different schematics for devices of this kind.


Thursday, July 7, 2011
Tube matcher calibration
One of the problems with any kind test equipment is doing some real world calibration and I tried a number of different ways of doing this with my recently constructed somewhat modified Jack Price tube matcher.
Ultimately what I figured out was to take a trio of tubes-6V6, 6L6GC, and 6550. Warm them up until they're stable, say, fifteen or twenty minutes or until the current gets as stable as it's ever going to be, and then get out your leather gloves and switch them to each socket in turn without touching the control settings. I figured that anything under 0.5 ma spread was all good and so it was.
These are now carefully stashed reference tubes, and I'm sitting on my string of 1 ohm resistors from the same batch.
One thing that did occur to me was to figure out a way to incorporate a trimmer into each tube cathode circuit for really tight calibration.
Film at 11.
Saturday, July 2, 2011
Vintage Parts Excursion, Part 2: Capacitor leakage tester


Since my last episode with capacitor leakage it seemed necessary to cook up another piece of guitar amp specific test gear to complement the tube matcher I built recently, namely, a direct reading capacitor leakage meter and reforming device.
The original schematic was something I found In Alan Douglas' Classic Tube Testers and Test Equipment, but I've modified it a bit to suit local conditions, as it were.
It started out life as a Jackson model 645 vacuum tube voltmeter that had been lurking in the dark under my workbench. I didn't have a need for it but I couldn't bring myself to part with it-mostly because I like Jackson test equipment.
I'd been thinking about keeping it as is but it needed a special purpose 4.5 volt battery I did not have, so I proceeded to repurpose it. I built the power supply out of a Hammond organ power transformer and more terminal strips. They're great for prototyping things as they can be easily pop riveted in a convenient place.
At present it's been mocked up and I'm trolling through my resistor museum for combinations that meet the schematic value. And that's one good thing you can do with a lot of old carbon composition resistors is find ones that you can use.
In the meantime I ordered up a Russian military surplus analog 100 microamp meter that looks like reverse engineered Weston stuff-a fitting tribute to the men and women of Frelinghuysen Avenue.
I'll probably finish most of the wiring this weekend of the Glorious Fourth, and then station myself by the mailbox for the package from Estonia carrying my spiffy new Soviet microammeter.
Stay tuned.